
This guide is provided to help you contribute to the Open Education Week calendar, a contribution system powered by community members who share their Open Week activities, whether they are online virtual events or local activities taking place where you teach and work. The goal is to make visible in the world how much is happening in Open Education, and not just limited to the one week in March that OEGlobal promotes.
We offer our a Handbook for Event Organisers and we invite you to take advantage of the visual imagery kit for graphics like the animation to the left, plus more OEWeek logos, slide backgrounds, and more media you can use to promote your own Open Education Week events.
If you added events previously, the process is similar, and you can use your previously created account to add ones for this year. Start by logging in or creating a new account on this site. See below for more details on planning and submitting your events. If you need help contact us any time via `openeducationweek@oeglobal.org`.
Events added to the main calendar are ones with a specific start and end date/time, such as a single webinar or lunch talk. If you are organizing a series, we appreciate having entries for all separate events, but if you prefer to add an entry for a series of events over a span of time, they will be listed on the Campaigns page.
Creating an Account
To add and manage all your contributed events, you can log in or create a new account on this site.
Event Information Needed
This will help you organize all the content you will need to efficiently enter events into the new form.
Using the Add Event Form
Here is guidance for specific parts of the form.
Below is a reference for using the OE Week form to add your event information. We offer a copiable Google Doc template you can use to organize all of the information required on the form so you can have all the information organized in advance.
Accounts on this site are needed only to add events. By creating an account, you will be able to directly make changes to your events at any time.
If you have previously create an account, please login now and proceed to the Add Event form.
Otherwise, get started by:
- Register to create an account.
- Wait for an email to arrive containing a verification link.
- The verification link will take you to a login page where you can use the email and password used in step 1.
- Once logged in you can access the Add Event form.
Note: Email addresses are used solely for the purpose of activating and using this web site. If you want us to delete your account after the event, prefer not to share an email address to create an account, please contact us at openeducationweek@oeglobal.org We can also accept information via email, you just will not be able to directly update it.
You can log out or change your password via the My Account menu item.
You can be prepared by having the following information organized in advanced. Get a copy of the event form fields as an editable Google Doc.
- Event Title: unique enough to be recognize on a list of other global events.
- Event Description: about 2-5 paragraphs to make it clear from a glance what the event is about. Entries can be formatted with typical styles, and can include lists, hyperlinks, etc
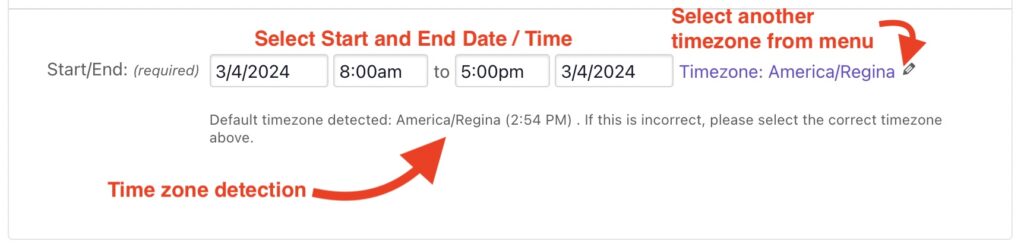
- Date and Time: the date during when an event takes place, and the local times it starts and ends. The form will attempt to detect your time zone, but you can select another timezone from a menu. If your event spans multiple days, it will be listed separately on the Campaigns page.
- Image (optional): an image, ideally dimensions 1280 x 720 pixels or larger, that will represent your event on the calendar. It can be a screenshot of an event web site, a photo or logo from your institution, or any other metaphor image to represent your event.
- Event Category: the best category to identify the topic of your event. See the list of category options, with descriptions and linked examples of previous events in the category.
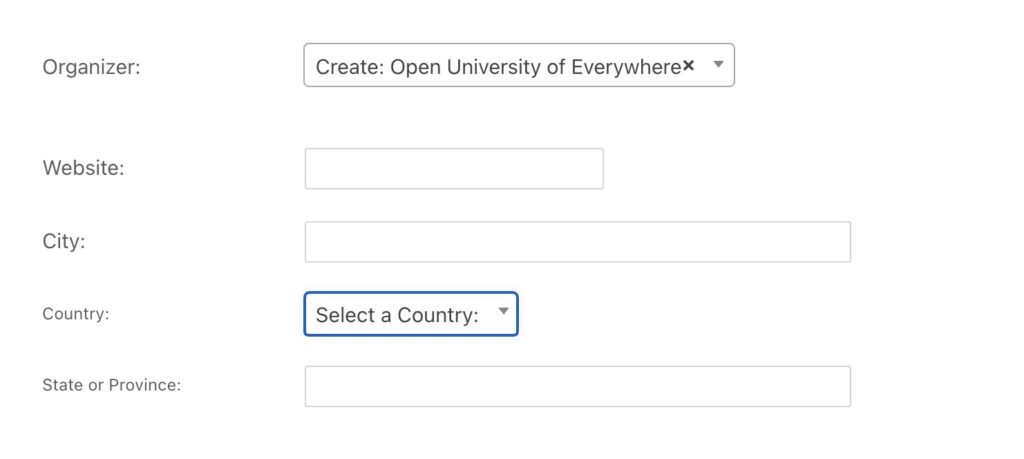
- Organizer: The name organization, institution, or person hosting the event. Along with a name, please also provide a web site address for the organizer, as well as a city, state/province (if appropriate) and country. The location information is used to create a map of all event organizers.
- Event Website: Enter the web address that has the complete information about the event
- Watch / Join / Register link (optional): web address to join, watch or register in advance for any online video sessions.
- Language: language used for the event. We encourage descriptions and events offered in non-English languages.
- OEGlobal Membership: Indicate if the organizer is an institutional member or individual member of OEGlobal (see institutional members list).
- Event Mode: Indicate the event as In-person, Online Open to Public (anyone can attend), Online Limited Access (if available only for a campus or designated audience) or a hybrid event.
- Event Format: Select the best description in terms of the event being a workshop, presentation, panel discussion, etc.
- OEWeek Social Media Platform: Select the social media channel where you or your organization will be actively sharing your event. We want to be able to follow and promote your activities in social media.
- Social Media Name: Enter the username/handle that we should use to mention you in that platform, e.g. in most places, we are known as OpenEdGlobal. Please omit an “@” symbol.
This section offers guidance for using the form for adding your OEWeek event. We welcome and encourage event information entered in non-English languages, which can be indicated in one of the form fields.
Get a copy of the event form fields as an editable Google Doc.
- Title and Description
- Make sure the title is specific enough to be distinguished from the listing of other events. The description should include enough pertinent detail to explain the event’s purpose, goals, and connection to Open Education. The field provides rich text editing tools for formatting, including hyperlinks. Content can be copy/pasted from web sites or documents, most formatting will be preserved.
- Time and Date
- Enter the time and date for your event in your local time. This site will attempt to identify your time zone. Check the current time status below to confirm it matches the time when you are editing. If it is not correct or you need to enter an event from a different time zone, use the menu to select a city in the time zone you need to use.
If you are running an event that spans across several days, select the start and end dates, and use the default 8:00am to 5:00pm times. These events will then show up every date in the range.
- Enter the time and date for your event in your local time. This site will attempt to identify your time zone. Check the current time status below to confirm it matches the time when you are editing. If it is not correct or you need to enter an event from a different time zone, use the menu to select a city in the time zone you need to use.
- Image
- Select an image file to upload that represents your event, ideally in dimensions of 1280px x 720px or larger. The image is optional, but will make your event stand out in the schedule
- Category
- Choose a category that best describes the topic of your event. This enables filtering of all events by this category (e.g. to allow visitors to see all events related to Open Pedagogy. See the Event Category guide for explanation and examples of previous events of the same type. If none apple, select the last item “z— Other”.
- Organizer (Host) Details
- Start typing the name of the organization hosting the event. If it already exists, click on the entry listed. If not, type the full name and click Create. This will reveal the fields to edit, including the web address for the organization as well its location in terms of city and country (plus state/province if relevant). This information is used to geolocate the place where the event originates on our global Open Education Event map.

- Event Website
- Enter the web address where anyone can find the full information about the event.
- Additional Fields
- Webinar Join / Register link (optional): The web address to join a webinar session or to a registration form that will provide this information.
- Language: Select the language the event will be offered in.
- OE Global Member: For data purposes only, indicate if the organizer listed above is an institutional or individual member of Open Education Global (see the list of institutional members and the list of Individual members).
- Event Mode: Indicate the appropriate option to identify an event as In-person, Online Open to Public (anyone can attend), Online Limited Audience, or as a Hybrid format.
- Event Format: Select the best description of the event in terms of it being a workshop, presentation, panel discussion, etc.
- OEWeek Social Media Platform: Select the social media channel where you or your organization will be actively sharing your event. We want to be able to follow and promote your activities in social media.
- Social Media Name: Enter the username/handle that we should use to mention you in that platform, e.g. in most places, we are known as OpenEdGlobal. Please omit an “@” symbol.
After Submitting an Event
Click Update Event to submit your event. You will see a preview for the submitted information, as well as a link to edit if changes need to be made.
All submitted events are saved as a draft for review by the OEWeek Team. You will receive an email confirming the initial submission and a second message will follow when the event has been approved and added to the OEWeek Events calendar. If you have any questions about your event submission or OEWeek in general, please use our contact page.
Note that you can always access all of the events you have submitted via the My Events menu item (under My Account). From there you can see the status, either Published (approved) or Pending (not reviewed yet). At anytime you can modify your events directly from this listing.